Showing posts with label Two Step Bird Punch. Show all posts

Thursday, March 20, 2014

Love Birds

Hello! Once again I am pulling a card from my long over due 'to blog' folder! This card was for my brother and sister in-law for their wedding.


I think last year every engagement and wedding we went to, the couple received a card with these 2 love birds!! I think they also got some variant on this colour combo as well - but I'm a believer it something works - stick to it! I do however love this now retired baja breeze dsp and the branch the birds are sitting on is created using the adorning accents. 

Thanks for looking and any question, just ask :)

Tuesday, January 28, 2014

Artfull Stampers Sale-a-Bration Blog Hop


Welcome to the annual Artfull Stampers Saleabration Blog Hop for 2014. What a fantastic way to start your crafting year with an exceptional catalogue jam packed with great new ideas, beautiful new products and the best thing - FREE products. The Artfull Stampers group have got together to showcase our beautiful new product offerings in the Saleabration catalogue - these items are unique offerings and will only be available during this promotion. So lets get started - all you need to do is follow the next blog button below as it takes you around the blog hop - grab a cuppa and sit back and enjoy!

Thanks for joining us today - You've should have just come from Karlie's blog. 

Ok, here is what I'm offering for the blog hop today:


I used the stamp set 'See Ya Later' and the banner punch which are all free through the SAB promotion. I love, love, love this sentiment from this set (they all are pretty cute though :) and the banner punch makes making banners a snap. I also used some new fancy foil designer vellum, which is available now through the new occasions catalogue. I gold embossed the sentiment and the birds are added with a whole lot of dimensionals. 

One tip I'll give you - when adhering the vellum to your card, place small pieces of adhesive (I used sticky strip for extra hold) behind the dots or pattern, so the adhesive doesn't show through and you'll get a more seem less look.


Thanks for looking and now it time to head on over to Alisa's blog to see what she has created :)


Sunday, January 19, 2014

Just for You

Good morning! So far so good, eh? If you follow me you will know that I'm trying to blog more this year and so far I'm not going too badly :)

Today I have a card that I created for a closed challenge site.


I love grey and white for a modern colour combo and love how the rose red flower just adds that extra bit of 'pop' and the leaves are from the bird builder punch. One tip I will give you is look at you punches, see if there are different shapes or uses you can see. You will get many more miles if you play around with your punches to create different shapes and sizes.

Any ways, as always thanks for looking :)

Monday, January 13, 2014

Wedding Cards #5

Ok, this is my final card for my wedding card installment and this one has to be my all time favorite.


I have used very vanilla and crumb cake as my colours and the background was created by inking up by vintage wallpaper EB folder and then embossing. I created the wreath using the branch from the bird builder punch and the birds have been sponged and layered onto the card with dimensionals. The sentiment is from Teeny Tiny sentiment set and I finished the wreath off with a pearl. I have used this design a few times before on a Christmas card and Money Holder and I still find it a winner :)

I hope over these past few days you have found some inspiration for those special occasions cards. If you used any of these ideas, I'd love to see them. Either leave me a comment with a link or email a pic - I love seeing how my creations can inspire others :)

As always any question just ask and thanks for looking


Thursday, January 9, 2014

Wedding Cards #1

Good morning! Well as part of my new years resolution, I want to blog on a more regular basis, which  in theory should make me create on a more regular basis (hopefully my theory works :)

Anyway, I haven't created anything this year (I'm preparing for a Little Mermaid/Ariel party for my DD) but I do have quite a few pics in my 'to blog' folder. They are however before I became a Stampin' Up! demonstrator, so there is some non SU! items used.
I made quite a few wedding cards at the beginning of last year and I'll share them over a few days.

First up is one I was inspired by one I saw on a blog which is no longer available, here is my interpretation:


I love the modern feel and clean lines of this design and it could be as a wedding, engagement or anniversary card. I love using the bird builder punch in this way and the hearts come from the owl builder punch. I also used vellum over a piece of grey card to give it a softer look.

Any questions just ask and as always I really appreciate you taking the time to check out my creations.

Tuesday, December 3, 2013

TSOT Holiday Tag

Hi, it's time again for another installment of Try Stampin' On Tuesday and this week we have something different for you. We have all created a tag and have a short tutorial for you, to give you a few ideas with the lead up to Christmas.

Here's my tag:


And my tutorial:


1. Die cut tag in old olive cardstock.
2. Layer a cherry cobbler piece 7.5 cm x 8 cm.
3. Layer whisper white card 7.3 cm x 8 cm.
4. Adhere a strip of cherry cobbler 3 cm x 8 cm along the bottom.


5. Adhere a strip of Seasons of Style DSP 2.6 cm, x 8 cm over cherry cobbler strip.

6. Using the bird punch, punch out a pile of the leaves. How many you punch put depends on how full
    you want your Christmas tree to look.

7. Starting with 4 leaves, start glueing them onto the right hand side of the tag. I like to use liquid glue
    for this job. Build up your tree until you are happy with it. Snip a small strip of soft suede and glue
    under leaves to create trunk. Glue on silver pearls to finish tree.

 8. Stamp sentiment onto whisper white and trim. Flag cut the ends and adhere to top of your tag as
     shown.

And the finished tag. I hope you like it and find the tutorial useful.


If you need more inspiration then head to here and see the other designers creations.

Thanks for looking.

Wednesday, August 7, 2013

TSOT #130

Good morning! It's time again for another sketch over at Try Stampin' On Tuesday. I used this one to make an engagement card for some family members.


I was quite happy with the end result. I did alter the sketch a little, but I'm sure thats ok :)
It's a short and sweet one from me today - I have a bazillion things to do.

Any questions just ask and thanks for looking


Tuesday, April 2, 2013

TSOT #112

Hello! It's time again for another fabulous sketch over at Try Stampin' On Tuesday. I actually made TWO cards with this sketch.


I went with two sympathy cards, but I could easily change out the sentiment. These cards all came about because of this cool ribbon I found at my local scrap booking store and it only came in brown -not my favourite colour. SO the challenge for me was to use this fab ribbon on a creation and not just buy it because it looked cool and stash it in my draw, never to be seen again!!

Looking at both of these cards, I dont think I have a favourite :) - do you??
I have used various embossing folders, punches and stamps on both cards, so if you have any questions, just ask :)

Now I know you'll want to see the other AMAZING creations from the other design members, so check them out here. Then link up your creation, because it's great seeing what you come up with.

I also wanted to say a big thanks to every one who takes the time to leave a comment. I truly love reading them and they make my day :)

Thanks for looking and have a great week :)

Tuesday, March 19, 2013

Two Love Birds - TSOT #110

Hello! Once again we have another great sketch to inspire you to get your crafty on over at Try Stampin' On Tuesday. I LOVE this sketch and as soon as I saw it, I knew exactly what I wanted to do.

Heres the sketch:


And what I came up with:


This is the anniversary card I gave to my Hubby - he loved it!
I flipped the sketch and changed the oval to a circle. I kept it clean and simple, with a basic grey and white colour combo, with a 'pop' of colour with real red. The sentiment is from fabulous phrases, the birds were punched out with the bird punch and the glimmer heart is from the owl builder punch and the real red heart is from heart to heart punch. The birds and heart are popped up on dimensionals.

I was really happy with how this turned out. Now over to you, go past the Try Stampin' On Tuesday blog and check out the other design team amazing creations and then link up your creation - it's great seeing what you come up with!

Thanks for looking :)

Friday, January 11, 2013

Vintage Wedding

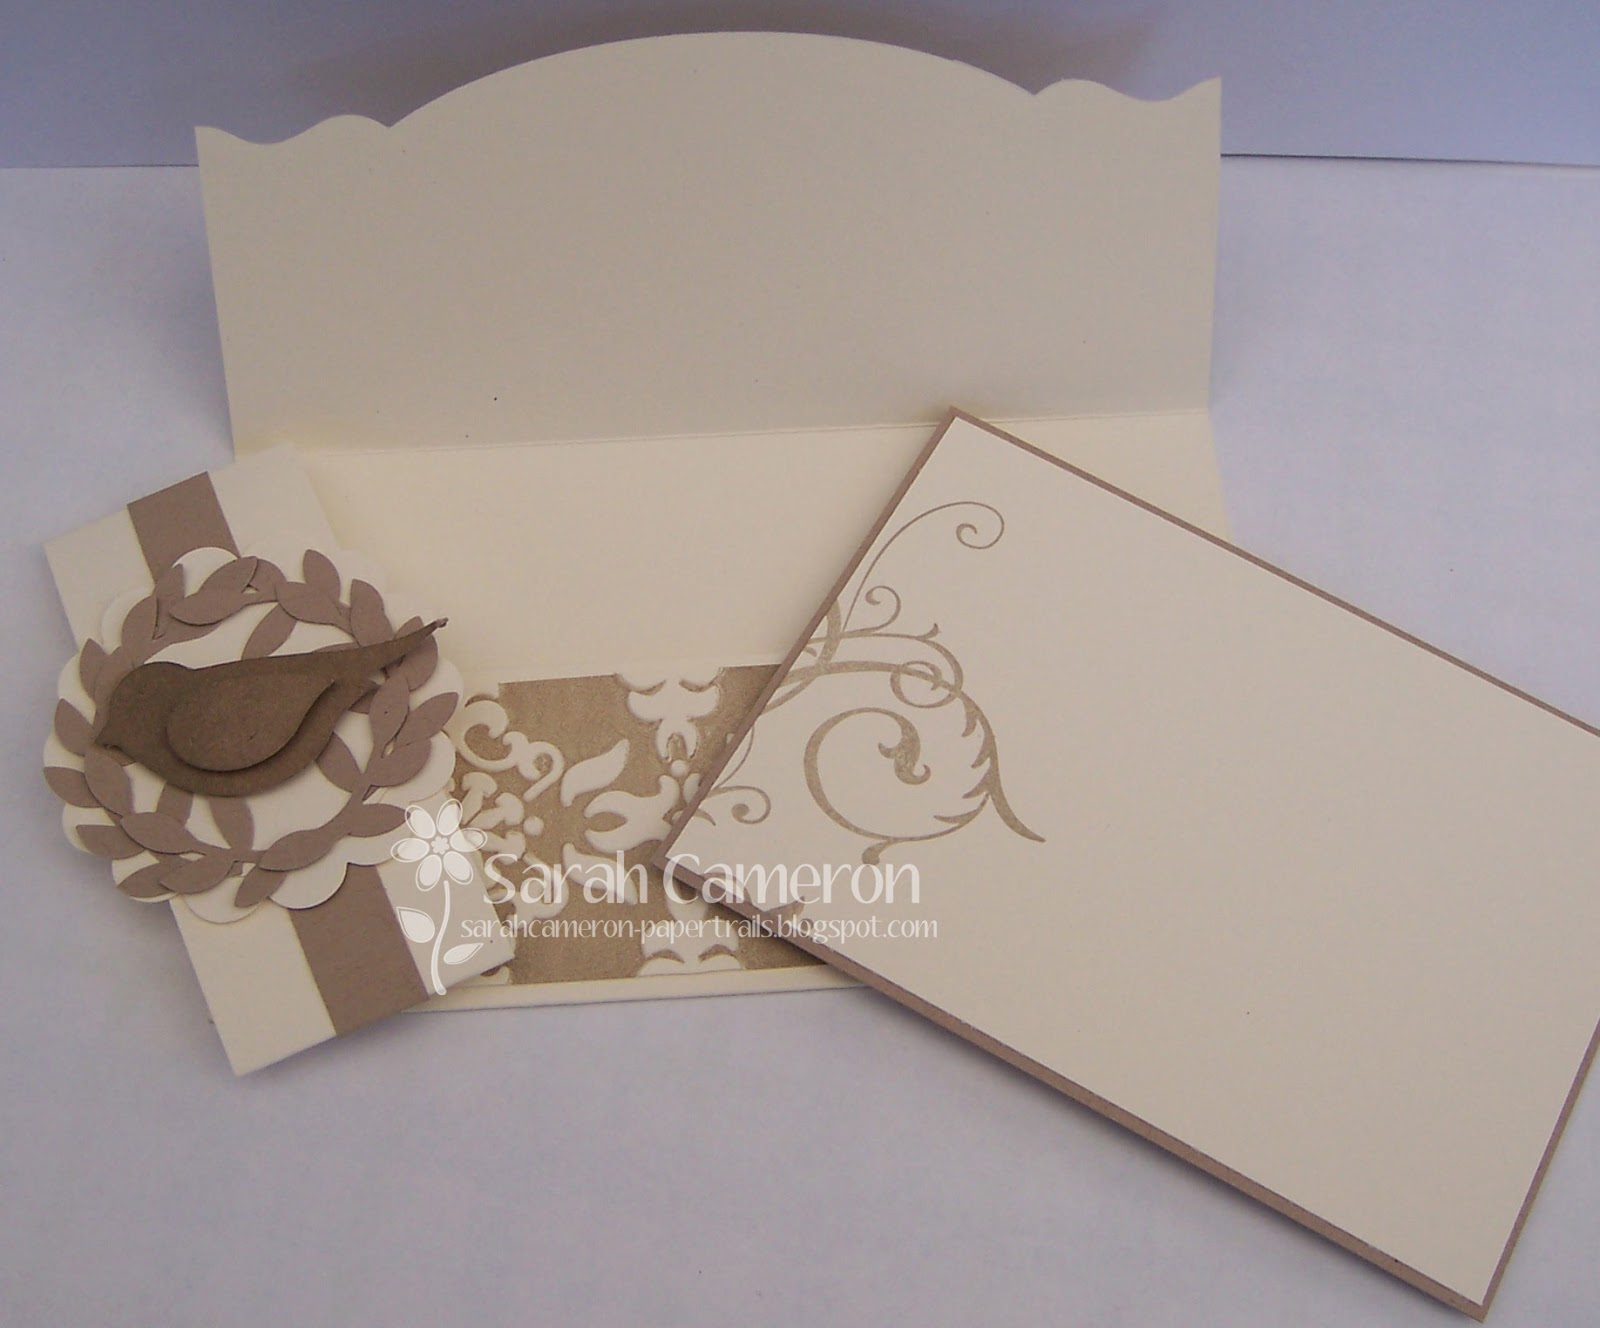
Hello. I was asked end of last year to make a envelop for my Aunty to give money for a wedding she was attending.

Here's what I came up with:


I used my adoring accents to cut the flap opening and I've layered the outside with very vanilla which has been embossed with my vintage wallpaper EB folder and I've brayered crumb cake on the non raised side of the folder to create subtle colour. My band is a piece of very vanilla, with a crumb cake strip of card and I've punched a scallop circle, lots of leaves and the bird from the bird builder punch to create the focal point. I brayered the bird with crumb cake ink to give it a bit more definition. I actually used this card I made recently as my inspiration. The card is layered onto crumb cake and has the swirl from 'baroque motifs' along the side. My Aunty was thrilled with the end result and said that this was definately one of a kind :)

Thanks for looking

Friday, November 30, 2012

Festive Friday #47 - Inspiration Photo

Hi Every one! It's time again for another Festive Friday and this week Nicole has given us an inspiration photo to work with.
Here's the photo:


Yes it's vintage, neutral colours with a bit of bling - well that is what inspired me any way - along with the cute little bird :)
So here is what I came up with:

I used very vanilla and crumb cake as my colours. I ran a piece of very vanilla through my big shot with the vintage wallpaper, but I brayered some crumb cake ink on to the non raised section of the embossing folder to create a soft coloured background to highlight the pattern (hope that all made sense!) and I've sponged all the edges. I pulled out my neglected bird punch for the little bird and the ring of leaves. I brayered some crumb cake ink over the bird which is punched out in crumb cake to get more definition for the bird. The sentiment was from the "jolly jingles" wheel and I added a few pearls to opposite corners. I was pretty happy with the result, that I've actually used the similar design in another project which I will share at a later date. This card has already gone to my parents as their Christmas card - thanks to the challenge I managed to be super organised this year!!

So why not use the photo to inspire you? We love to see what you create!

Thanks for looking

Tuesday, June 5, 2012

Elegant Three

Hello! I'm popping by to show you a few cards I made a while ago. They are quite a collaboration of different companies products. For all of them, the base and lacy circle are elegant eggplant, the dsp is bella bleu, the leaves are in old olive and punched out with the bird punch and the flowers are punched out with the boho blossom punch all Stampin up. The gold and white shimmer card is from Cristina Re, the cream card is from Artee, the pearls are from Kaiser Craft and the butterfly is from Martha Stewart. The lacy circle is from nestabilities.

The sentiment is from Stampin Up's 'On your Birthday' 

 The sentiment is from Verve stamps plain jane collection

This sentiment is also from Verve stamps plain jane collection

I was definitely on a roll when I made these, and I quite like them all :)

Thanks for looking 

Wednesday, October 26, 2011

Santa Toppers

Hi! Hope your all having a great day so far. I recently came across these cuties from Dawn Olchefske. I thought I'd make a few now, as it's not too long till christmas (2 months!!)


Firstly, please excuse the snake lolly, I didn't have anything else! Any way back to santa, I did change a few things like the beard; I dont have the ornament punch so out came my scallop punch and I embossed it with 'budding vine' from Craft Concepts. Also I changed the embossing on santa's hat to 'perfect polka dots' as I didn't have the same one and the pom is from the flower on the boho punch, but I love Dawns version with the sparkly circle. I think he turned out pretty good. I'm going to work on a reindeer in the next week (whenever time permits ;) Hopefully be back soon to share. 
Thanks for looking.

Monday, October 17, 2011

Clean & Simple Christmas in Red & Green- PP68

Hi all! This week I decided to enter in The Paper Players challenge which is to make a clean and simple Christmas card using green and red. Here's what I came up with:


I'm going to keep this short, as I'm busy, busy!
Thanks for looking and have a great day!

Thursday, September 22, 2011

Card Kit Contest

Hi! A few months ago, my Stampin' Up demonstrator Nicole sent me one of her 'Card kits'. It's a competition where she sends out left over cards from her workshops to some of her customers. The rules were that I had to use everything in the kit - I could add to the kit, but not take anything away. I was sent two kits and this is what I came up with:


This kit had early expresso base, daffodil delight, whisper white and early expresso ribbon. I added rose red, old olive and an antique brad. I made the flowers with the wing from the two step bird punch and the leaves are the body of the bird just cut down to size.


This next card gave me grief. I had baja breeze base, riding hood red, old olive, so saffron and very vanilla. I added soft suede for the owls and some riding hood red dsp and some 'chino' pearls from Kaiser Craft. It took me quite a while to come up with this card. I tried to sketch many different things, but nothing worked till I threw my hands in the air and walked away. I came back a little later and came up with this in about an hour - love how that works sometimes :)

Not sure if you can see, but I've inked my square lattice embossing folder in so saffron and then ran it through my big shot -  I love this subtle effect. The so saffron frame was created with the decorative label punch. I was really happy with how it turned out and so did Nicole, as I won second prize!

Thanks for looking.

Monday, September 19, 2011

Just Add Ink 85 - Just add baby

 Hi again! This week at Just Add Ink the challenge is to "Just add baby". I loved this colour combo of pink and brown that I've seen on a few blogs (I'm not really a 'brown' person, so I don't normally use it) and I still am in love with easel cards. Heres what I came up with:


I've used soft suede, pink pirouette and certainly celery and I've add a lot of pearls! I sponged all the pink pirouette dsp in soft suede and added just a little bit of colour to the main image. 
Hmmm, now I just need someone to have a baby girl - any takers? 
Thanks for looking.

Sunday, August 14, 2011

Congratulations

I thought I'd quickly pop in and post a card I had made a while ago.


I love the simplicity of this card. The flower is made using Stampin' Up's scallop punch, I then scrunched the scallops and repeated. The more layers the fuller the flower. 
Thanks for looking.

Friday, July 8, 2011

Wedding Congrats

Hi again! This card is another case (I promise I do have my own ideas!) but I really liked this card done by Melissa. I loved the modern feel of the card and that it was quite a simple card. The square shape is cut out with stampin' ups top note die cut, here's a video from Mary Fish - enjoy.